

Thursday, April 4, 2013
This is a Test!!
Wednesday, October 17, 2012
Eggplant Mozzarella Melt - Recipe and Review!!
Ok, so quick recap. My husband is a full time pharmacy student, and also works full time as an intern for CVS pharmacy. Long story short? I have a LOT of free time during the week. I usually go visit my horse at the barn, but I only do this about 2-3 nights a week (and weekends of course), so that means I have 2-3 OTHER evening where I don't have much to do. SOOO...I either craft, or I cook. Right now I've been cooking, simply because I get hungry, and that way there is some sort of dinner for my hubby when he gets home.
Tonights meal?? Eggplant Mozzarella Melt! Whoho! Oh and tonights movie's are Harry Potter and Goblet of Fire (about the last 30 minutes) and Harry Potter and the Order of the Phoenix. ABC is doing their Halloween TV stuff...so LOTS of Harry Potter!
I basically follow the recipe exactly. It was quite delicious! The only thing I would change - is add a bit more tomato sauce, a lot of my sauce just soaked into the bread and their wasn't much 'saucyness' to the finished product. Still awesome tho! This will definitely be a repeat meal! Good luck!
 I used the recipe from Martha Stewart -> http://www.marthastewart.com/340875/eggplant-and-mozzarella-melt
- 2 large eggs
- Coarse salt and ground pepper
- 3/4 cup plain dried breadcrumbs
- Olive oil, for baking sheet
- 1 medium eggplant (about 1 pound), sliced into 1/2-inch-thick rounds
- 1 loaf (8 ounces) soft Italian bread
- 2 cups store-bought tomato sauce
- 8 ounces part-skim mozzarella cheese, thinly sliced
Directions
- Preheat oven to 475 degrees. In a shallow bowl, lightly beat eggs with 1 teaspoon salt and 1/4 teaspoon pepper. Spread breadcrumbs in a pie plate or shallow bowl.
- Oil a rimmed baking sheet. Dip eggplant rounds in egg, then dredge in breadcrumbs, turning to coat completely; transfer to prepared baking sheet. Bake (without turning) until golden and tender, 15 to 20 minutes.
- Meanwhile, split bread lengthwise, and place cut side up on another baking sheet; press gently in centers to create a well. Layer both halves with tomato sauce, eggplant, and cheese. Bake until cheese is browned in spots, 6 to 8 minutes.
Delicious Skinny Tortilla Pizza - Recipe and Review Time!
Hello!
So I had a wonderful eggplant melt planned for tonight, but I was missing a couple key ingredients and we'll.. It just wasn't meant to be I guess. One of the downsides of shopping for 2 weeks at once is you do tend to forget a thing or two... Oops!
Instead I made these yummy yummy yummy skinny tortillas!

Now I made some glorious homemade tortillas last night, and the 2 extra left over were supposed to be for my hubby's egg burritos, but I forgot to tell him about it this morning, and we'll, I just knew these would be just as lovely for dinner!
Now I made this recipe for two peeps, so just double/triple/whatever it if you need more.
Persian Pickles Skinny Tortilla Pizzas
2 - 8 inch tortillas... Doesn't have to be homemade :)
1/2 C. Prego Tomato Sauce (yes I think this is the best brand, but anything yummy will do!)
4 oz. Mozzerela Cheese
1/4 C. Baby Spinach
1/4 C. Shredded, seasoned, cooked chicken breast. (season this however you like, I prefer soy sauce, garlic salt, and pepper.)
Heat your oven to 400 degrees.
I put the ingredients on in this order - Sauce, Cheese, Spinach, Chicken, & a little more cheese to top it off!
Place the pizzas on a lightly greased cookie sheet. Bake for 10 minutes. Tada! Delicious pizzas!
Top with parmesan cheese and savor the flavor baby!
Thanks for stopping by!
-Dana
Monday, October 15, 2012
Homemade Tortilla Walk-Thru and Flauta Recipe Review
Hi!
So today was very 'focused' day at work, so besides going to the barn and visiting my horses, coming home and trying a new recipe while watching my favorite episodes of Doctor Who is second best! Just for the record, episodes of Doctor Who watched were....Asylum of the Daleks, Dinosaurs on a Space Ship, The Impossible Planet, and The Satin Pit. I made two recipes, so yes, it took me 3 1/3 episodes to complete them. The Satin Pit is on right now! Woho!
Ok...so! I made these delicious homemade tortillas with this recipe from The Life and Love's of Grumpys Honeybunch (what a adorable name!) Please visit her blog for the recipe.

Ok so here goes the walk-thru! So first let me say that these homemade tortillas are WAY better than anything store bought, and totally worth the time!

I measured out my flour and crisco. I got to say, i LOVE the crisco that comes in the sticks. It makes measuring just that much simpler, and a bit more easy to clean up also.
I mixed up the crisco and flour real good with my hands. It took me a few minutes to get all the crisco fully mixed into the flower (third picture in the collage above).
Following my recipe I added my 3/4 cup of salty water a little at a time, and stirred. I ended up using about 1 full cup to get the final result (bottom right picture above).
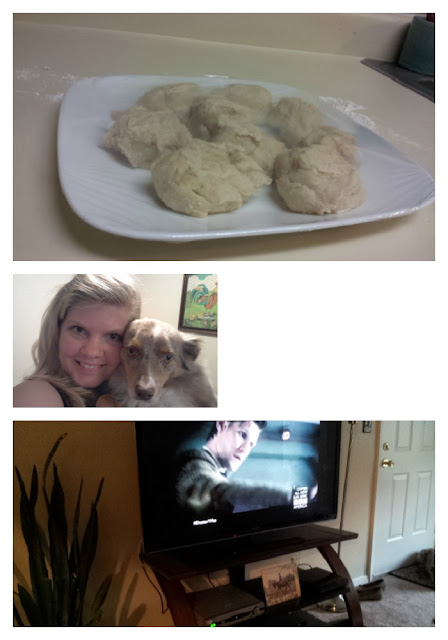


Well I hope you enjoyed this walk thru/review of these homemade tortillas! I must say that homemade IS the way to go for these things, they are absolutely divine and taste completely gourmet and WAY better than the store bought ones. GOOD LUCK!
So today was very 'focused' day at work, so besides going to the barn and visiting my horses, coming home and trying a new recipe while watching my favorite episodes of Doctor Who is second best! Just for the record, episodes of Doctor Who watched were....Asylum of the Daleks, Dinosaurs on a Space Ship, The Impossible Planet, and The Satin Pit. I made two recipes, so yes, it took me 3 1/3 episodes to complete them. The Satin Pit is on right now! Woho!
Ok...so! I made these delicious homemade tortillas with this recipe from The Life and Love's of Grumpys Honeybunch (what a adorable name!) Please visit her blog for the recipe.
Ok so here goes the walk-thru! So first let me say that these homemade tortillas are WAY better than anything store bought, and totally worth the time!

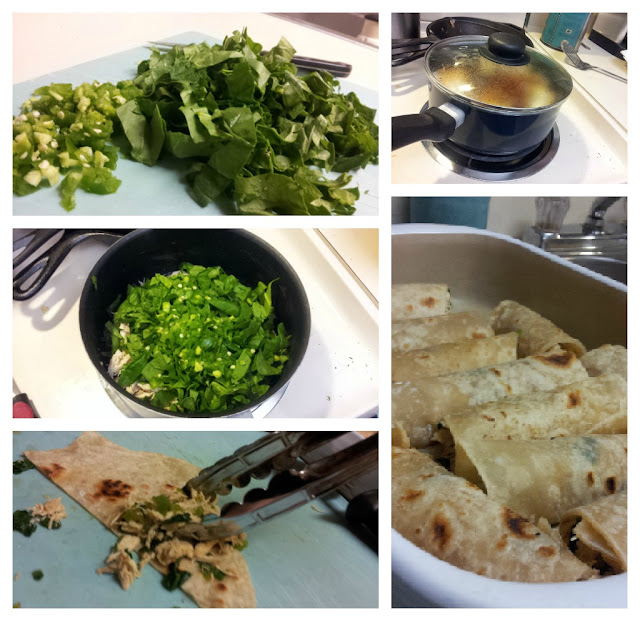
Ok so I got all my ingredients out at once because I'm one of those people who can easily feel very overwhelmed in the kitchen. If I have everything out in front of me and make a complete mess while I'm at it...I'm good!
I measured out my flour and crisco. I got to say, i LOVE the crisco that comes in the sticks. It makes measuring just that much simpler, and a bit more easy to clean up also.
I mixed up the crisco and flour real good with my hands. It took me a few minutes to get all the crisco fully mixed into the flower (third picture in the collage above).
Following my recipe I added my 3/4 cup of salty water a little at a time, and stirred. I ended up using about 1 full cup to get the final result (bottom right picture above).

Ok so I followed the instructions and kneaded my dough (no pics! Sorry!). I couldn't help but have some flash back of the year of ceramics classes I took in collage. It took a little bit of effort to stop pounding that clay on the counter and start putting them into balls.
FYI the recipe made 12 balls, i got 9. Not sure how that happened, maybe my tortillas were a little bigger than plans, but I was very happy with the 9.
Then it told me to let the dough sit for 30 minutes. So in my 30 minutes, I took a quick shot of me and Bandit, watched some Doctor Who (Asylum of the Daleks pictured!) Aaannddd.....I cleaned up my kitchen! I apologize for the poor panoramic pic...still getting used to it!

OK! So its been 30 minutes - I used some extra flour like the recipe said all over my rolling pin and counter top. Don't worry...its sanitized! My hubby bought me that amazing rolling pin for our first christmas together. What a sweetheart!
I'll be honest, getting the tortilla to roll out in a nice purty circle does take some effort, and a lot of finesse...probably more than I have! But I managed to get them mostly round.
Then I put them in my pan! Now I am in love with my cast iron pan, and thats all i ever use, so I actually went against the recipe a bit and added a bit of olive oil to lube up my cast iron and made her a little happier about roasting some tortillas. They came out perfectly fine, but I supposed I did add quite a few extra calories.
Believe it or not, they started to roast up nicely. I'd say the tortillas spent about 2 minutes on each side, but like the instructions said, each one will cook at its own time.
I didn't have any cloth napkins like the instructions called for, but I used nice thick paper towels, and to be honest, those seemed to work quite well.

Now I made these homemade tortillas to replace the store bought ones, considering I can make about 3 dozen for the price of one 8 pack. It was a bit of work, but I think with practice, it will go by rather fast!
I had two left over from my Flauta's recipe for my hubby to try out with his breakfast burritos in the morning.
I used a chicken flauta recipe from Healthy Delicious! Please visit her blog for the recipe.


I must say! I give these chicken flauta's a 10/10 stars. They were absolutely delish! So light and yummy, yet so flavorful and filling at the same time.
Saturday, October 13, 2012
Hasselbeck Baked Potato Recipe Review - yes I made this and they were pretty awesome!
I made these wonderful scalloped baked potato things from Pinterest and they were actually pretty yummy! I just wanted to give a quick review and also a few tips on what I think I could have done differently. Every recipe needs a little tweaking, and most meals seem to come out out different in each kitchen.
I used the recipe from Seasaltwithfood.
My sister-in-law and her (new!) hubby came over for dinner. I made my own recipe of Soy Sugar Salmon, with a side of almond green beans and these hasselback potatos. They loved the potatos and had such great things to say about them, but my main complaint was they came out a little harder than I prefer.
Changes:
Bake them at a higher heat than 220 degrees. I did 4 potatoes at 250 for an hour (the recipe called for 40 min) .... Still to stiff. I would recommend normal baking temperatures, or better yet, stab your potato a bit and stick them in the microwave for 8-10 minutes before you bake. This will get you a much softer potato, which I prefer.
Also, I served them with sour cream and shredded cheese, which I think was a win!
If the potatos were a little more tender, I'd give them 4.5/5, which qualifies for a remake in my household. So make these tweaks and you should be good to go.
Thanks for stopping by! Enjoy the amazing potatos!
Saturday, October 6, 2012
Bedroom Curtains! They are finally finished and I even bought a curtain tie back for them.
Ok so this project isn't much a DIY project, as much as it is just a normal home decorating idea. So I hope you enjoy the pictures and can find some inspiration!
We have a fairly small master bedroom. Its about 12x12, and in the corner is a nice little window. The only downside of this window, is that it leads out right to the public apartment breezeway. Yes its possible creepers could try to sneak a peak into our bedroom. So with this window, we DID decided to go with the more opaque option.
I actually wasn't too creative with this venture. My husband and I visited the local Bed Bath & Beyond to pick up a wedding present for a friend (turned out to be a great wedding! Lots of free drinks!). We also agreed that we would glance at the curtains because we knew we'd be getting one for the bedroom at some point in time. Low and behold, we BOTH fell in love with the display model of this arrangement, so I really couldn't say no. I mean how often does that happen? Both agreeing on something, that is... Actually, I shouldn't say that! I have a ton of fun decorating and being creative with my hubby. However, it does take a little compromise at times. :) But this arrangement took no compromise at all so we snatched it up right then. It was a SIGN!

I'm trying to create a dark grey/turquoise theme in our room Ya, I'll let you know how that turns out. So far its been interesting and I'm not sure those colors are really meant to live in such close proximity.

I got this lovely tie back from Hobby Lobby. I actually went there with the thought that i would buy supplies and make my own DIY tieback...but this one was so great, why not? And it was only $8.40. For me, a major contributor to going DIY is to save money. Yes I LOVE being crafty too, but when supplies cost about $18-20 and this tieback was only $8.40.....I think the choice is simple.
Well that about wraps it up! Thanks for visiting!
Thursday, October 4, 2012
I just about have my living room JUST how I like it! Apartment lighting, see through curtains, and papered bookshelves.
Hello readers!
So we moved into our new apartment oh...about 1 1/2 months ago. Now I know these things take time, but the living room really hasn't started to come together until the past couple of days. I started by de-cluttering the area around the window. Yes I had some decorative chairs there and other what nots that just really were not holding their own. I wanted a sort of retro/vintagy feel to the window area. Its a lovely bay-ish (but not quite) window and also the only source of light into the kitchen/livingroom/dining room. So I don't really have the option of lushing it up with thick gorgeous drapes...which trust me, I would love.
So I know most apartments are designed like this...you get one HUGE window to light...well....everything. Here is my window.
My next goal in life it to start using before and after pictures when I do things like this. This goal has not been reached yet.
Before I took this shot, I had some adorably tacky orange and blue decorative stools on both sides of the window, the shelf was more cluttered than it is here (here it is neat by my standards!) and their was no greenery in site. If you ask me, one thing that lightens up a dull apartment is some nice plants.
So I removed the tacky yet cute chairs, rescued some forgotten plants from my porch (along with that CUTE glass metal table), and organized up my shelf a bit.
Now notice the curtains are nice meshy organza type material, and its not even covering the whole window. This type of arrangement still looks like you acknowledge windows need some dressings, but also allows an exorbitant amount of light into the living space as well. Green plants light up an apartment, and so does...LIGHT!
So enough about light...lets check out that paper back grounded bookshelf!
So we moved into our new apartment oh...about 1 1/2 months ago. Now I know these things take time, but the living room really hasn't started to come together until the past couple of days. I started by de-cluttering the area around the window. Yes I had some decorative chairs there and other what nots that just really were not holding their own. I wanted a sort of retro/vintagy feel to the window area. Its a lovely bay-ish (but not quite) window and also the only source of light into the kitchen/livingroom/dining room. So I don't really have the option of lushing it up with thick gorgeous drapes...which trust me, I would love.
So I know most apartments are designed like this...you get one HUGE window to light...well....everything. Here is my window.
 |
| Click for full sized version! |
My next goal in life it to start using before and after pictures when I do things like this. This goal has not been reached yet.
Before I took this shot, I had some adorably tacky orange and blue decorative stools on both sides of the window, the shelf was more cluttered than it is here (here it is neat by my standards!) and their was no greenery in site. If you ask me, one thing that lightens up a dull apartment is some nice plants.
So I removed the tacky yet cute chairs, rescued some forgotten plants from my porch (along with that CUTE glass metal table), and organized up my shelf a bit.
Now notice the curtains are nice meshy organza type material, and its not even covering the whole window. This type of arrangement still looks like you acknowledge windows need some dressings, but also allows an exorbitant amount of light into the living space as well. Green plants light up an apartment, and so does...LIGHT!
So enough about light...lets check out that paper back grounded bookshelf!
 |
| Click for full sized version! |
Yes..I did it. I papered the background of my bookshelf! How could I not when they looked so excellent on Pinterest. I would like to point out my husbands Fantasy Football trophy at the peak of the shelf. Yes, I'm such a great wife. ;)
Well I hope you found this post useful on how to light an apartment living room, and maybe some other ideas as well. Enjoy your day!
Monday, September 24, 2012
Learn how to remove wax from candle jars and even you can have a trendy apothecary type jar for your bathroom!
Hello!
Ok so I loooove containers. its hard for me to toss out anything that can actually hold something in it. Even the leftover cardboard boxes from our move stayed in the guest bedroom a little longer than entirely needed.
Imagine my thrill when my husband came home from our local Grocery Store with these lovely candle jars. While the Cucumber Melon scent was just glorious, each time I lit a candle I reveled in the day when I could turn this jar into something else.
Well..that day has come!
I did some research on Pinterest & YouTube on the best ways to remove candle wax from a jar. Well....to be completely honest, they all sucked. One blog said to freeze the candle for 24 hours and then scrape it out in chunks with a spoon....really? The other said to boil hot water and poor it directly into the candle jar.
Well I thought both those methods sounded extremely time consuming and messy, so I just used my common sense, and came up with my own method.
Now my candle had about 1 inch of unusable candle wax in the bottom of it when I started.
- First I set a pan to boil on the stove. I used a medium sized sauce pan, and filled it about half way full of water.
- Then I set the candle jar in the boiling water for about 30 seconds. The wax melted around the outside edges of the jar, and I was able to remove the 'clump' of wax from the jar super easy with a fork. I dropped that sucker in a very very used disposable tupperware container, which later went in the trash.
- There was a little bit of wax left in the jar, so then I sorta rolled it around in the 'gently' boiling water to remove the wax. Most of it floated off into the water.
- Then I used a pot holder to hold the candle jar, and then wiped out the little bit of liquid wax that was left with a paper towel. I did not find the glass to be super hot...but if you leave your jar submerged in the boiling water for any extended amount of time, be very careful at this step!
- Then there was a tiny tiny bit of waxy residue left, so I scrubbed that out with lots of soap and hot water in the sink, then let my water run super hot for a minute or so. I was a little paranoid about the tiny bit of wax going down the drain, but so far, so good ;).
- Then I stuck the candle jar in the dishwasher and VIOLA! A nice shiny, pretty jar with a awesome lid to hold my Q-tips.
- About half of the water boiled away from the sauce pan, so I took that off the burner, let it cool, and then poured the remaining waxy water into the tupperware container, lidded it, and tossed the whole thing in the trash. Like I said before, it was at the end of its usable life anyways; it was 'disposable', and I was too paranoid to poor it down the sink.
SO!
 |
| Final product! Before, on the left, After, on the right. (duh!) |
As you can see, my hubby recently purchased TWO new candles, so in a couple of months, I can wash, rinse, and repeat.
I hope you found this useful! Thanks!
Dana
Sunday, September 23, 2012
Shower Curtain, Facelift, & an Apology.
Hi Readers!
First let me say thank you so much for taking the time out of your day to check up on my blog. It really does mean A LOT.
I'm hoping to become more active in my blogging and posting. I really do a lot in my life, and I think its important to keep it documented and shared.
I've decided to convert this blog from a 'crafting and cardmaking blog', to an overall DIY and apartment lifestyle blog.
Purpose: I feel a lot of DIYer's get a little overwhelmed by the growing amount of pictures and inspirational blogs. So overwhelmed, that they just give up on a project before they even start. I myself, must say I am guilty! The reasons are usually simple. Its too expensive. It takes up to much time. I'm just not that creative. Etc. My goal is to help woman (and men??) realize that all those pinterest projects are VERY possible.
I will be posting a lot of before an after projects of pinterest (and others) inspired projects. They won't be exact, and they wont be perfect. They will be a low budget version, and probably not as fancy. But by golly, it will be one thing. Completed!! :D
Lets start with my most recently completed project.
Analysis:
Cost: $0 - because I used ribbon I already had (thanks Mom!)
A bit of a shoulder ache, because I don't own a step stool.
What I learned: When tying the bows, I learned the over-then-thru technique made for a more wholesome bow, instead of the regular shoe tying style of under-then-thru.
I'm very pleased with the outcome! Love the different colors. I originally just used the different colors as a 'trial' because I didn't have enough ribbon of the color I wanted (the coral). Our new two bedroom apartment has two full bathrooms, so I applied this awesome feature to MY bathroom.
And now for the APOLOGY:
I seem to have accidentally deleted all the Picasa photos used I have used in the past, which has created a LOT of broken images in the history of the blog. I'm working on recovering them. Thanks!
Thanks for reading!
Dana
First let me say thank you so much for taking the time out of your day to check up on my blog. It really does mean A LOT.
I'm hoping to become more active in my blogging and posting. I really do a lot in my life, and I think its important to keep it documented and shared.
I've decided to convert this blog from a 'crafting and cardmaking blog', to an overall DIY and apartment lifestyle blog.
Purpose: I feel a lot of DIYer's get a little overwhelmed by the growing amount of pictures and inspirational blogs. So overwhelmed, that they just give up on a project before they even start. I myself, must say I am guilty! The reasons are usually simple. Its too expensive. It takes up to much time. I'm just not that creative. Etc. My goal is to help woman (and men??) realize that all those pinterest projects are VERY possible.
I will be posting a lot of before an after projects of pinterest (and others) inspired projects. They won't be exact, and they wont be perfect. They will be a low budget version, and probably not as fancy. But by golly, it will be one thing. Completed!! :D
Lets start with my most recently completed project.
 |
| Inspiration! |
 |
| Completed Project! |
Cost: $0 - because I used ribbon I already had (thanks Mom!)
A bit of a shoulder ache, because I don't own a step stool.
What I learned: When tying the bows, I learned the over-then-thru technique made for a more wholesome bow, instead of the regular shoe tying style of under-then-thru.
I'm very pleased with the outcome! Love the different colors. I originally just used the different colors as a 'trial' because I didn't have enough ribbon of the color I wanted (the coral). Our new two bedroom apartment has two full bathrooms, so I applied this awesome feature to MY bathroom.
And now for the APOLOGY:
I seem to have accidentally deleted all the Picasa photos used I have used in the past, which has created a LOT of broken images in the history of the blog. I'm working on recovering them. Thanks!
Thanks for reading!
Dana
Tuesday, February 14, 2012
Can You Digi It? Valentines Day Challenge

The Can You Digi It? Blog has done it again! A brand new Challenge with an awesome theme. Puppy Love!! This card features the fabulous 'Latte' Digi stamp, which is available in the Can You Digi It? store now. Enjoy the great challenge!

Subscribe to:
Posts (Atom)